Peg bags are a useful way of storing pegs, ready to hang your laundry. To make life easier while hanging washing, have one that can be attached to your washing line and moved around as you go while you are hanging the washing. These instructions will show you how to make your very own peg bag, using the exact material you want!
It is perfectly OK to use material that has already been used for something else (for example old bed covers with a pretty pattern or old clothes as long they are in good condition) or you can buy new material. If buying new material, it is advisable to wash it first just to stop any potential colour run should the bag get wet or be placed on top of wet washing before being hung out to dry. Although other fabrics can be used, material that is predominately cotton works really well.
What you need
- Cotton material – it doesn’t all have to be the same, but you will need a back piece and two pieces that equate to the same as the front piece.
- A small coat hanger (a child’s one work really well). The metal hook ones are the best for being slid across the washing line.
- A small piece of ribbon (to tie a bow on the hook)
- Paper to use for a template
- A good, sharp pair of scissors.
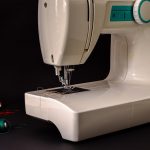
- Sewing machine and thread (colour of your choice)
How to make
- First of all you need to make your template. Making a template will just make life a little easier, rather than potentially measuring incorrectly on the material. Take your paper and cut a rectangle shape around 50cm long and then make it 4 cm wider than your coat hanger.
- Draw a straight line across the width 20cm from the top of the template. Draw another line across the width 22 cm down from the top. Place your coat hanger at the top of the piece of paper with the hook part just above. Draw a line following the curve of each side of the hook. Once you get to the corners of the coat hanger, allow 1 1/2cm from this point to the sides of the paper (this it to allow for the seam and the coat hanger to sit in the material) and draw a line each side to the bottom of your page. Now you have your template. Cut it out ready to make the main peg bag.
- Place your template on the wrong side of the material you wish to use. Draw around it, and cut out. Use this as the back piece. Using the lines drawn on your template, draw around and cut out the two pieces of material needed for the front piece (remember the front piece is in two pieces so that there is a split to put your pegs in the bag!).
- Now take the two pieces of material that will be the front of your peg bag. Place them right sides together, with the bottom edge of the top piece on top of the top edge of the bottom piece and pin in place. Using your machine, stitch roughly 7 cm from each edge, ensuring there is a gap in the middle ( don’t stitch all the way along as you need a gap to put your pegs in the bag). Allow a 1cm seam allowance. Then, zig-zag stitch the raw edges. Now, press the seams open and top stitch the edges of the seam.
- Now take the piece of material for the back of the bag. Put this piece with your front piece, right sides together. Using your machine, top stitch around the two sides and top. Leave roughly 1cm in the middle part of the top to allow the hook of the coat hanger to go through. Where the curves of the coat hanger are, trim into the seam allowance. Turn the material right side out the press the bag.
- Get your coat hanger, and put it in the bag so that the hook is sticking out at the top. This can be a bit tricky; it helps if you put the hanger through at an angle.
- At the bottom edge of the bag, turn in around 1cm for the seam and press. Pin the pieces together and then top stitch along the bottom edge.
- The final stage is to add the ribbon. Simply tie the ribbon as a bow around the handle. Now type peg bag is ready to use! Simply add your pegs.